Everyone's style is different and this is just the way I do mine...I'm not here to teach, I just wanted to share "my way" with you all.
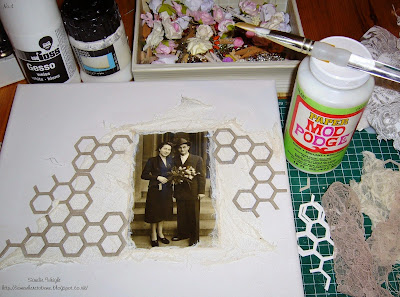
To start I collected all the items I needed for the first stage as you can see in the photo below. My canvas is 12"x 12", but if you have never attempted this style of mixed media on a canvas before, it would be better for you to start with a smaller canvas. I would recommend using a deep edged canvas as once they are finish they can be quite heavy, the deeper edged canvas tend to keep their shape better than the thin or cheaper ones. It is worth paying attention to that as it will be something that you will want to keep or sell.
I have used a genuine photo on my canvas (my godmothers wedding,from way back in the early 50's)
I used mod podge to adhere the photo to the canvas, then left it to dry overnight...of course you don't have to use a photo, you can use anything as your focal point. You can also photo copy a photo and use that rather than a genuine photo, make sure that it is completely dry before using it though otherwise the ink will smear.
The next stage was to lightly brush over the photo with mod podge, ensuring the edges of the photo get a good seal...again this was left for a while to dry completely...before adding another coat.
(Tip....The edges of the photo must be sealed so your inks don't run underneath and cause air bubbles under the image.)
While I was waiting for the mod podge to dry, I collected the bits and pieces that I would be using on my canvas, although I did add extra bits as I went along...
Here you can see the lace,beads button,flowers,pegs,all sorts of stuff, including bits of jewellery.
(Tip.... if you use any metal items that may be prone to rust, then give them one or two coats of mod podge to seal them.)
Here I have started to add the scrim/cheesecloth, using mod podge, then added some chicken wire shaped grey board.
( Tip....personally I try to keep my pieces mainly horizontal or vertical as too many curves can make the finished canvas look untidy )
(Tip....I left my canvas on an easel in my lounge for a few days, this way I can see if I needed to add anything else...or remove any pieces.)
Now I am completely happy with all the elements on my canvas, I gave it a coat of gesso, making sure I got in to all the small areas where items have been glued.....I also used some of the textured gesso and stippled it in some areas.
I left it to dry overnight, then gave it another 2 coats of smooth gesso,making sure it was dry between coats.
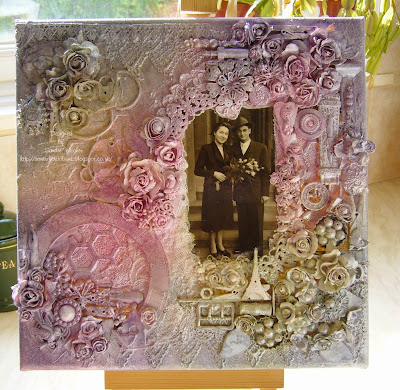
I chose Silver and Raspberry Cosmic Shimmer Mist sprays and I also mixed up some Mica Powder in Mustard Gold for the main colours for my canvas. I also used Artiste Spritzing Ink in White, it has a gorgeous shimmer to it and covers a bit better than the white shimmermist.
I scrunched up 2 baby wipes and covered my photo, these sprays do tend to go everywhere.
I sprayed from the top right down to the bottom left and then sprayed the opposing corners in the mustard gold. I did use a heat tool to help with the drying, please be careful not to get too close as the gesso under the spray inks can bubble and blister.
I then resprayed the same areas....once dry I did spray for a third time.
Again once dry I added the silver spray to the corners, note the corners where the Raspberry colour is has now gone a lovely mauve shade, while the gold/green corners have gone silvery grey.
(Tip...drying between 2 different colour sprays,stops them from muddying)
(Tip....you will need to change the wipes covering the photo as they will have got quite inky...if you find any colour on your image,you can remove it with a clean wet wipe, the wipe won't affect your photo as it has been sealed with the mod podge.)
Leaving my canvas overnight to allow the inks to finish drying, some areas like under the flowers etc tend to stay a little damp even after using a heat gun....I then covered the photo with wipes and went all over the canvas with the Artiste White Spritzing Ink...I laid the canvas flat to dry for a couple of hours.
The edges of the canvas can be painted, or inked,the choice is yours...I dabbed mine with a sponge soaked in the same inks that I used for the front.
( click on the photo to enlarge it )
(Tip... to finish you can highlight areas with gilding wax,which I haven't done on this one,but have done on other canvas's that I've done.)
So here we are, my finished canvas, sorry about the background view, it was such a bright day that the light in my kitchen was better for the photo...
I hope you enjoyed my tutorial and I am so pleased you read through to the end...
Don't forget we still have 2 weeks left in our June Challenge...which you can find here at


5 comments:
Oh wow have been waiting for this tutorial...on my "to make" list...thanks it's fabulous.xx{aNNie My Personal Blog}
What a lovely canvas and that photograph is lovely, Sandie. A tutorial so well explained, I really want to try one like this. Thanks for all the little in formations. Hugs.
So lovely to see how your stunning project all came together. Thanks for sharing and all your tips.
Hope your feeling a bit better today.
Hugs, Julie x
What an INCREDIBLE tutorial Sandie. And such a EXQUISITELY LOVELY creation - WOW. Your personal vintage photo makes it all the more special. The colors are GORGEOUS and I love all the little bits and babbles you added. I know this took a LOT of time... and you remembered to take pictures - great pictures - all the way thru.... THANKS BUNCHES. It's WONDERFUL. j.
This is such a gorgeous piece Sandra, holy wowsers!! You have used so many wonderful elements to create all your texture, I could stare at it for hours and still find new things to ooh and aah at!! Gorgeous colours, so soft and romantic! Loved watching your process, took lots of notes too! Love it! hugs :)
Post a Comment