Followers

Wednesday, March 28, 2018

Diamonds are Forever...

This is the theme for this fortnights challenge over at Tag Tuesday
Such a great theme...I had fun creating my Tag..well I actually made 3 but I will post them all separately as the main image differs from each other...
The tag was created by me using oxide inks, stencils and stamps from my stash....then I scanned it....


I then overlaid the Marilyn Monroe image over the top using serif and added the script using the paint programme...and here it is....

Diamonds are a girls best Friend

 I shall be posting the next 2 tags over the next week or so...

Do pop over and join in with the challenge..you can find it here at 


Thursday, March 22, 2018

Things with Wings...

A craft group I am a member of has just started a fun challenge..no swaps, well not as yet, but that could change...anyway the challenge is to create a Gothic Arch using Things with Wings..and interpret in our own way, so here is mine....


I used a cereal box and cut several arches, then over laid them with white card that I had decorated using oxide inks. 
Taking one arch, I trimmed it to size and then added some background using stencils and a grungy stamp.
I stamped the man twice on some spare card and coloured him..cutting the wings and hat from the first stamped image and adhering them to the arch... then I added the body & head...adding the previously cut crown to the head.
The sentiment is part of the main image..again I stamped that section on some spare card and cut and adhered to the jacket...to finish I added a set of bingo numbers above the image.
I think I'm going to enjoy these challenges...lol


Wednesday, March 14, 2018

Easter Tag

I have been having a play tonight with my digi images and kits..it's been quite a while since I last did any. The base of the Tag is actually an image of my own that I made using Oxide Inks.
The new challenge over at Tag Tuesday for this fortnight is "Spring/Easter" and the theme was chosen by team member Joan.
I, believe it or not, struggle with any thing that is "Easter" related...and seeing as my fibromyalgia is having a flare up, I decided to try making my tag digitally as it is less painful to do.


Do pop over and join in with the challenge at 
Hope to see you there soon....x


Monday, March 5, 2018

Vintage Mini Book Box

It's the 5th March and time for another challenge over at More Mixed Media....as always it is anything goes, but each month there is the option to use the colour chosen for each month.
The colour for March is Green.


I sealed the paper mache box box with gesso, then painted it in pale green acrylic paint by Kaisercraft.
The spine cracked slightly when the paint was dry, but that just added to the vintage look, so I wasn't particularly bothered.

I layered fabrics on the lid and added the green lace, roses ribbon, the image and buttons.


I lined the inside of the box with some fab papers that our boss lady Lozzy gave me for christmas.


Isn't this little girl adorable..I found her over at Alpha Stamps on one of their collage sheets..so I just had to buy some of the sheets.
Do pop over and have a look and hopefully enter this months challenge..our design team are waiting to visit and leave some love on your blogs...
You can find us here at 

Sunday, March 4, 2018

Spring Flowers Tag

The snow has finally disappeared here..personally I love the snow, it looks so beautiful. It's quite rare to get snow this far down in the UK..so I can appreciate the beauty of it.
I am way behind in posting my Tag for the Spring Flower Tag Challenge ( Wendy's theme ) over at Tag Tuesday. I made it a few weeks ago and thought it was for this coming tuesday..naughty me for not checking on the dates..no damage done as I am still within the challenge times.


I have used a large tag and stamped the sentiment ( by Inkylicious ) at the top. The Crocus stamp is one that I have had in my stash for years, I think I won it in a bundle from Artistic Outpost..I remember receiving a huge bag of random stamps as an extra prize from them.
So, I stamped the flowers along the lower edge using the masking method...
To colour, I used a damp brush and distress inks.
To finish I distressed the edges of the tag. 
Do pop over and enter the challenge Wendy would love to see your beautiful tags.
You can find the challenge here at 

Thursday, March 1, 2018

My little Tower Block.

Hello..are you all knee deep in snow ???...bitterly cold and snowy in my part of the world..and we rarely get snow,lol.
I've been busy creating a few projects and this is my project for our March Challenge over at Rhedd's Creative Spirit.


I was fortunate to find a whole bag of children's building blocks made from solid wood in a charity shop..I've had them quite some time, in fact after washing them, my great grandson plays with most of them when he stays over....but I did keep some for altering!


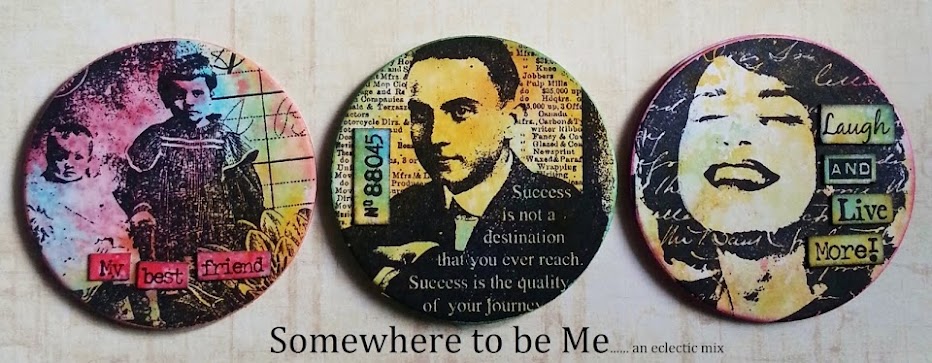
The painted blocks were sanded down, the others I applied gesso directly to the bare wood.


I used Oxide distress inks on several sheets of 200gsm card..once the card was dry I stamped all over them.


All that was left to do was to cut sections of the card to suit each brick..I used book glue to make sure the card adhered securely to each brick.


Once I assembled and glued each piece in place, I sprayed it twice with a glossy sealer....
Sadly the photos don't do the Tower justice, the colours are a lot more brighter and there is also a shine to it that the camera hasn't picked up...
We would love to see you enter our challenge...you can find us here at
Rhedd's Creative Spirit

Steampunk Reversed Canvas

It's time for March's Challenge over at Altered Eclectics and for my project I thought I would do my first ever reversed canvas...Yes I know it is small, but now I have the confidence to create a larger one the next time around...lol


I sanded down the wooden frame as it was pretty rough..then painted both sides with gesso.
Once that was dry I  followed the same process using  turquoise acrylic paint.
After the paint was dry I sponged the rust effect paint in a few areas around the frame.
While that was drying I cut the chicken wire ( from Fernli Designs ) to size and added the rust effect paint to it...also did the same with the cogs and dragonfly.


I found a scrap of paper that was the perfect for the inside of my frame..once that was glued in to place, I added the watch with the attached key, securing it with hot glue.
To finish I adhered the chicken wire across the front of the frame and then the cogs ( from Fernli Designs ) with hot glue.
Finally I added the dragonfly.
Do pop over and have a play in our challenge..you can find us here at